- Home
- Services/IndustriesServicesindustries
- About Us
- LocationsStatesAccordion ContentAccordion ContentAccordion ContentAccordion Content
- Job Openings
- Quick Links
- ATS Family

3D X-Ray Imaging Through Computed Tomography
Applied Technical Services offers clients incomparable diagnostic power through our industrial CT scanning labs, which perform 3D X-ray imaging on parts and assemblies. Otherwise known as computed tomography, CT derives from traditional radiography — a form of imaging that uses X-rays to allow technicians a cross-sectional look inside of a subject as if it had been bisected. This 2D imaging technique has held an irrefutable place in the medical field for several decades; millions of patients around the world receive X-rays every day to help diagnose potential issues ranging from digestive blockage to bone fractures. It is only more recently that people began using radiography for industrial applications, including concrete inspection and weld assessment.
Like its precursor, CT saw its primary initial use as a medical imaging tool. This method uses a series of X-ray exposures to create hundreds or even thousands of images referred to as tomograms or slices. Technicians collate these slices to produce 3D X-ray models (called voxel-based point clouds) that display a cross-sectional view of the subject from every conceivable angle, tilt, rotation, elevation, and orientation. Such rich data has proven invaluable to hospitals in locating blood clots, detecting tumors, imaging changes in long-term conditions such as heart disease, and a variety of other uses. CT too has only seen industrial applications later in its history, as improvements in modern computing power have made the method more accessible to more testing and inspection companies like ATS.
CT Scanning Applications
The 3D X-rays produced by CT offer a variety of industrial uses. Models produced in this way display every surface of the sample subject, both inside and out. Furthermore, because so many individual slices make up the 3D model, it offers clarity and detail enough to generate a CAD file. Our technicians can use this CAD file, which they make available to clients upon request, to accomplish a variety of goals, including:
- Design Spec Compliance
- Reverse Engineering
- First Article Inspection
- Engineering
- Forensic Investigation
- Nondestructive Testing
- Quality Assurance
- Flaw Detection/Identification
- Thickness Measurements
- Metallurgy
Our Imaging Tools and Capabilities
ATS uses superior equipment to perform our CT imaging services. Our skilled technicians draw on their experience using this advanced instrumentation to yield rich 3D X-ray models and precise measurements. What follows is a list of our CT imaging tools:
- Northstar Imaging X5000
- Minifocus 450kV X-ray projector (0.016” Focal spot at 3mA)
- Dual energy capability with 225kV Microfocus X-ray Machine
- Can achieve focal size as low as 0.0002” (based on voltage)
- Multi-Axis Manipulator (x, z, tilt, rotation), capable of supporting max 250 lb
- Resolution of manipulator angle is 0.001°
- Capture elongated subjects unable to fit within a single exposure by scanning with a spiral acquisition
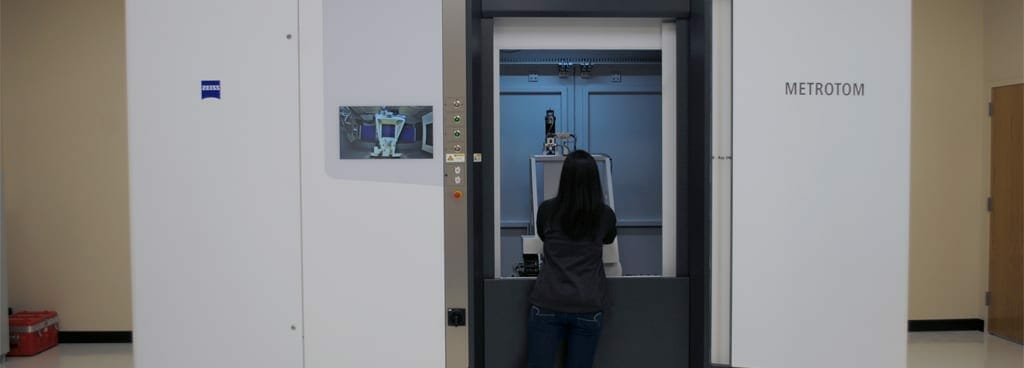
- Zeiss Metrotom 1500, with a 225kV micro-focus
- Chamber fits specimens up to 11.75 in (300mm) in diameter x 23.6 in (600mm) high. 50 kg (110 lb) weight limit.
- Annual A2LA calibration
- Certified to accuracy within 4.5 microns
About ATS
In the last 50+ years, Applied Technical Services has offered testing, consulting engineering, and inspection capabilities of the finest quality. Since our founding in 1967, our company has enjoyed substantial growth: from a group of three engineers aiding local businesses from their headquarters in our founder’s basement, ATS has since developed into a multidisciplinary firm that employs a roster of several hundred technicians, Professional Engineers, inspectors, chemists, scientists, investigators, and calibrators to serve clients around the globe. Of the many we serve, the industries that most benefit from our 3D X-ray imaging capabilities include the following:
- Renewable Energy
- Additive Manufacturing
- Power Generation
- Aerospace/Aircraft
- Nuclear
- Automotive
- Insurance/Legal
- Conventional Manufacturing
- Healthcare/Medical
- Defense/Military
Upholding Quality as a Guiding Principle
ATS values our clientele and pledges to provide them the highest quality of services possible. In this interest, all our CT technicians perform their imaging services in compliance with our ISO 9001:2015-registered quality management system. Abiding by the internationally recognized precepts for quality assurance that are outlined in the standard prepares our company to continually improve the quality of our services.
We take a variety of measures to ensure a positive customer experience when working with ATS. First, our technicians pledge to return clear, accurate, and detailed reporting within a short turnaround window. We recognize that clients need timely information to make informed decisions based on the results of our analysis, and so our labs submit their findings in an average of 5–7 business days from the time they receive a sample subject. Second, we empower our customer service ambassadors to receive contact from clients who have questions about the status or results of their testing. These client relationship specialists facilitate contact between the customer and the most relevant testing personnel to help them answer their concerns. Finally, members of our lab staff remain accessible to clients who reach out for clarification on their testing. They remain responsive to the customer’s needs and engaged while helping them secure solutions to their problems.
If your company needs the services of a respected 3D X-ray imaging provider, contact ATS today — We take a closer look!

Request Form
"*" indicates required fields
