- Home
- Services/IndustriesServicesindustries
- About Us
- LocationsStatesAccordion ContentAccordion ContentAccordion ContentAccordion Content
- Job Openings
- Quick Links
- ATS Family

How CT Scan Companies Can Serve Nondestructive Testing Needs
Applied Technical Services stands at the forefront of industrial CT scan companies by employing the method’s versatility and precision to serve clients in a variety of applications. More formally known as computed tomography, CT represents the most powerful method of nondestructive testing currently available. While people are more familiar with the method’s medical uses (which allows doctors to detect and locate issues ranging from internal bleeding to cancerous tumors), CT scanning has seen increasing use in industrial applications. Companies can request a CT scan on their parts, components, and assemblies to achieve a variety of goals, such as:
- Reverse Engineering
- Quality Assurance
- Design Specification Compliance
- First Article Inspection
- Thickness Measurements
- Dimensional Layouts
- Flaw Detection/Identification
- Material/Part Failure Analysis
- Litigation Support
How the Method Works
Being an offshoot of traditional radiography, the computed tomography process bears some similarities: CT scans produce tomograms (black-and-white images also known as slices that depict a cross-sectional view of the subject as if bisected) by exposing a sample part to a barrage of X-Rays which are captured by a detector mounted opposite. The major differences between the methods present themselves in the number of images produced by a single test and how those images can be used.
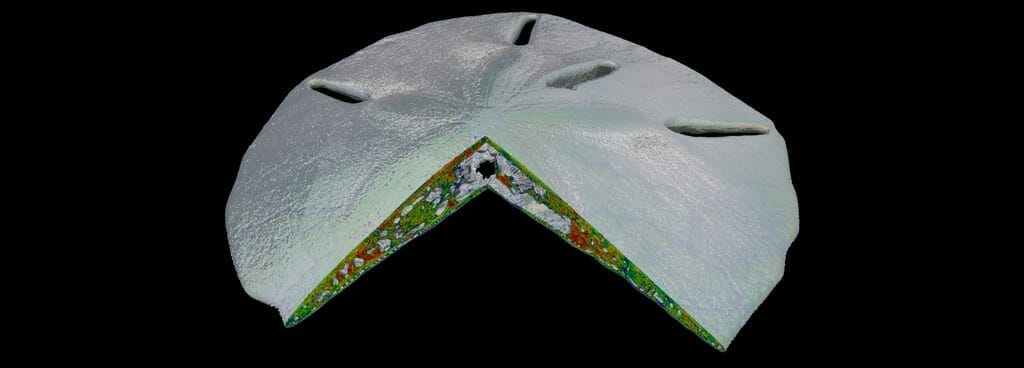
At the beginning of a CT scan, a pedestal inside the chamber moves the subject into the path of the X-Rays. This platform will then maneuver the sample subject so that a new angle faces the projector, allowing the next slice to capture a different view of the object. CT requires that the machine repeat this process hundreds or even thousands of times — exposing the subject at every conceivable angle, rotation, tilt, and elevation. Once they have this collection of 2D images, our technicians then compile the slices into a single, 3D X-ray model.
The sheer number of slices used to create this model ensures that it is a rich, highly detailed representation of a subject’s every surface, both inside and out. Our technicians can convert the model produced by the CT process (called a voxel-based point cloud) into a CAD model for additional utility, such as taking measurements or providing a copy to the client.
Our Equipment and Testing Capabilities
To provide the most reliable data we possibly can, ATS maintains a team of experienced CT technicians. These specialists use our lab’s advanced instrumentation to produce models and measurements that are precise enough to exceed client expectations. Their tools of the trade are as follows:
- Northstar Imaging X5000
- Minifocus 450kV X-ray projector (0.016” Focal spot at 3mA)
- Dual energy capability with 225kV Microfocus X-ray Projector
- Can achieve focal size as low as 0.0002” (based on voltage)
- Multi-Axis Manipulator (x, z, tilt, rotation), capable of supporting max 250 lb
- Resolution of manipulator angle is 0.001°
- Capture elongated subjects unable to fit within a single exposure by scanning with a spiral acquisition
- Zeiss Metrotom 1500, with a 225kV micro-focus
- Chamber fits specimens up to 11.75 in (300mm) in diameter x 23.6 in (600mm) high. 50 kg (110 lb) weight limit.
- Annual A2LA calibration
- Certified to accuracy within 4.5 microns
ATS: an Industry Leader
Over the past 50+ years, Applied Technical Services has provided testing, inspection, and consulting engineering capabilities of the highest caliber. Since our founding in 1967, our company has grown tremendously; from three engineers helping local companies out of our founder’s basement, ATS has since become a multidisciplinary firm that employs a stable of several hundred technicians, inspectors, Professional Engineers, investigators, chemists, and scientists to serve clients around the world. Of the many we serve, the industries that most benefit from our expertise as a CT scan company include:
- Additive Manufacturing
- Renewable Energy
- Aerospace/Aircraft
- Power Generation
- Automotive
- Nuclear
- Conventional Manufacturing
- Insurance/Legal
- Defense/Military
- Healthcare/Medical
Committed to Quality
ATS values our clients and the quality of service they receive when working with us. For this reason, we ensure that all our technicians perform every CT scan in compliance with our ISO 9001:2015-registered quality assurance program. Abiding by this system has empowered our company to continually improve the quality of our services by implementing policies such as the following:
- All testing personnel return detailed, accurate, and clear reporting within a short turnaround window to allow clients to make timely, informed decisions based on our analysis
- Our customer service representatives receive clients who have questions about either the status or the results of their testing and facilitate contact with relevant analysis experts
- Lab members pledge to remain accessible to customers with concerns, responsive to their needs, and engaged while helping them secure a solution to their problem
If you need a component or subassembly CT scanned for an industrial application, contact a trusted CT scan company like ATS today — We take a closer look!

Request Form
"*" indicates required fields
